One thing we realized right away in our gardening in zone 3, is that we needed to have some kind of season extension if we wanted to grow anything beyond the basics. So we decided on building an A-frame greenhouse. Simple and easy, right? Well…. not when you decide to make it 2000sq feet. Yes, that was not a typo. So. What plan did we use? Well, we didn’t. We read lots of e-books, articles and blog posts, watched many youtube videos and then we decided to make up our own plan.
We originally wanted to do a sunken greenhouse using geothermal and use it all year round, based on the ideas and plans of Greenhouse In the Snow in Nebraska where they grow perennials like citrus fruit trees all year round. But we really didn’t have the money or equipment or man-power to make that happen.
We decided on something simpler, an A-frame from 2-6’s mounted on posts set in cement and covered with plastic. To begin with we would grow in the the soil there and later add raised garden beds. This took us 3-4 months to simply build the greenhouse frame and cover with plastic, this was only the two of us though, with occasional help from the children.


The first step was to paint all the boards white. This would help prolong the life of the boards when under the plastic by reflecting light away from the boards instead of soaking in the heat.


Next we sunk the first four posts into the ground and assembled the first 2 “A”s for putting on them. This was not an exact science as we used the width of the A to decide where the second post should go after setting the first post at the correct distance from the fence line. If we do this again, properly surveying the site would be our first step but we are true DIYers, in the sense that it never looks as good as it did on pinterest but hey, it works. Really its not that bad, but it was a learning process.

So the first 2 A’s were up and now we had something to attach all the rest of the A’s to. This part was the hardest as it really was only the two of us (at this point the children weren’t allowed anywhere near!) lifting those huge frames onto the posts. As we continued down the row of 12 A-frames it was easier in a sense because we didn’t have to hold it as long before it was braced. Really by the end of it we were practically pros. Ha.
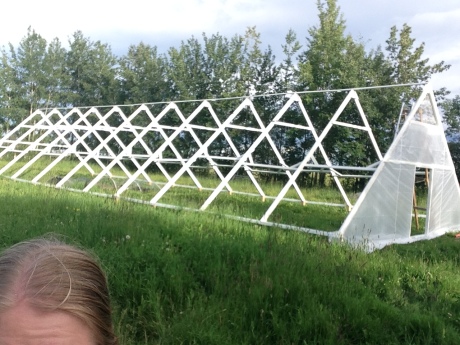
After all the frames were up,it was time to take the final measurements and order the plastic. We ordered from Northern Greenhouse, they were great to work with and a Canadian company (no exchange or customs) and the owner had built A-frame greenhouses before and had great instruction on how to install the plastic. We installed the end panels first and then we were ready for putting the big sheet of plastic over the top.


So how did we get this huge sheet of plastic up and over the A-frame of the greenhouse? Well, since we had no idea ourselves what we were going to do, we didn’t want to bother our friends and neighbors into coming over and hanging out trying to figure it out. “So lets try this…” …”Well, that didn’t work, lets try this now…” etc, we decided to give it a try ourselves.
In the end, we managed to get it just over halfway by moving that ladder around inside the greenhouse, pulling up the plastic and clamping it in place. Then, once we were over the peak of the greenhouse we tied ropes to each end corner and instead of fighting the wind as we had been, we used each gust of wind to balloon out the plastic and then we pulled down on our side and it actually worked! Have you ever played with a parachute as a kid in gym class? Its kind of the same concept and that’s where I got the idea from.

Here is the finished product, at least it was for then, as you can see, the tilling worked wonders in resurrecting a ton of weeds. In the background you see our organic weed-killers at work. Once we had the greenhouse secured on the sides for the winter we let them out of the cage and they had the run of the greenhouse. They did a good job of taking care of the weeds!

Here we are during a February melt just last week. As you can see the greenhouse has some low spots! This late winter/early spring we’ll be focusing on getting it ready for this season. We need to fix some ventilation issues by installing a large door at the east end of the greenhouse as well, also the sides of the greenhouse need more lathe holding down the plastic as even with all the doors and windows shut, it still flaps in the breeze. We’ll also be working on the growing beds.
We’ve decided on a simple hand tilling of the the soil in the beds (which need to be marked out first) just to loosen the soil and then we’ll build the soil up on top of the existing top soil. Our topsoil is not very deep here and we hit clay only a few inches down, so rather than trying to dig into the soil and turn it up and amend it, it makes more sense to loosen it a bit for roots and add a lot of compost and soil on top of that, covered with mulch. Our plan is to loosen the soil (only in the beds) then spread a thick layer of tree chip mulch over everything, (we got 3 dumptruck loads in the fall from our local tree toppers). Then we will build with compost and hay. First compost to plant into (I think we’ll probably need a dump truck load of that) then hay to mulch and later we’ll add more hay as the first layer begins to decompose, this is called the Ruth Stout method, or a no-dig garden. It will be a longer process and our plants this year may not be as great as our plants will be in three years or so but it will be an ongoing process that I think will end up producing a better product in the long run.


